Product discontinued, though sometimes still available on the used market and supported by some current software. For example, Silverfast 8 still supports the Coolscan 5000 ED. This article is kept here for legacy purposes.
Nikon is now on its third full generation of desktop scanners, and as you might expect, the latest models generate improved results over the previous ones. Moreover, the price has dropped a bit so that today's mid-level scanner (the 5000 reviewed here) is priced about where the low-level one was at introduction. On the physical side, like a lot of us, the Coolscan has bulked up in size and weight over the years, though it still remains a relatively modest sized footprint on the desktop.
The Coolpix 5000 ED hooks to your computer via USB 2.0, which provides fast enough throughput to keep up with the scanning mechanism. All three new scanners (V, 5000, and 9000) are 4000 dpi, which is a bump over the previous low end and a significant bump over the first generation I wrote about before. The actual scanning is done via a 3964-pixel line CCD (actually two lines in the 5000 and three lines on the 9000 models). The ED in their name indicates their is ED-type glass in the scanning mechanism. ED glass is used by Nikon to insure that colors all focus at the same point.
As before, Nikon relies upon Applied Science Fiction's Digital ICE, though now we also have Digital ROC, Digital GEM, and Digital DEE to add to our "what the heck is that" list (see right column, further down). ICE is now referred to as ICE 4, so I suppose some day we'll get an update to ICE 9 and our scanners will all freeze over (warning: obscure Vonnegut reference). Density levels on the Coolscan 5000 ED are claimed as 4.8, a marked improvement over previous Coolscans.
Density measurements are an indicator of how much dynamic range a scanner produces. The higher the density number, the more shadow detail you'll see in your scans. 3.6 is a decent number, about the minimum you'd want these days in a product directed at serious users; 4.0 is excellent; and anything over 4.2 should probably be considered state of the art, at least for desktop scanners with most 35mm slide films. In general, density is the most significant specification for a scanner. If you have two otherwise identical choices, one with a higher dpi (resolution) and the other with a higher density, in most cases you should take the latter.
Setting Up
The Super Coolscan 5000 ED is reasonably small in size (see Product Specifications, in right column). It uses a USB 2.0 interface to talk to the computer, something virtually all PCs and all Macs have these days. You don't have to open up your computer to install a SCSI board as you did with the first generation Coolscans.
Installation consists of installing the Nikon Scan 4.x software on your computer, restart (for Windows), then plug in the scanner (well, okay, you have some tape to remove from the scanner as it comes out of the box plus the slide tray to install, but these are simple steps well described in the Quick Start). Nothing to it, and all three of the machines I tried my new scanner on had no problems in getting the software installed or the scanner recognized.
With the Coolscan 5000 ED you get a basic slide mount adapter, but none of the fancy film strip or slide loaders. Since I rarely shoot negative film, I installed the slide adapter in my scanner and have never taken it out (thus, I won't comment on the ability to scan a strip of film). To install an adapter, you pull out the placeholder that ships with the unit and plug in the adapter. All that sounds harder than it is. Technically, it's about as difficult as putting a slice of bread in the toaster.
If you're wondering about power, the Coolscan 5000 ED doesn't use a "wall wart." Instead, it has a detachable power cable that plugs directly into your AC mains. (It's not mentioned anywhere in the manuals or on the box, but the Coolscan 5000 ED supports 100-240v at either 50 or 60 Hertz.) There's also a power switch on the front of the Coolscan, for those of you who are energy conscious.
Scans Away...
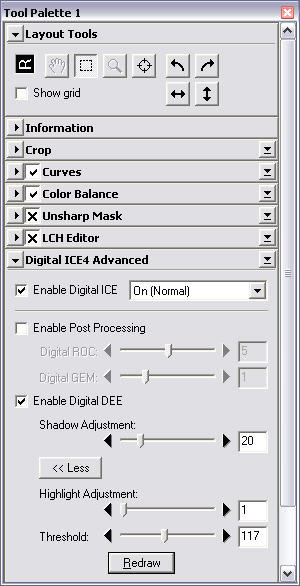
Amazingly, Nikon Scan software still pretty much looks the same as it did with the first generation of Coolscans, with the main difference being a tool palette instead of the overly clever tool drawers pinned to the side of the window in the earlier versions. Again, the user interface is a little too gimmicky and non-intuitive. Even pull-down menu lists have a custom look, though at least they're recognizable as pull-downs. On the plus side, some of my previous nits (what's the difference between a Prescan button and Preview button) have disappeared, so it does appear that Nikon is listening to users and removing some of the more annoying aspects of the interface.
Like Nikon Capture (used with the Nikon DSLR cameras), the tool palette for Nikon Scan uses the "on/off" approach to tools. If they're checked, a tool is on and active; if there's an "x", it's off and not used. Like Capture, however, it's very possible to get interactions between tools (Curves and LCH Editor, for instance), so be very careful about only turning on the tools that you're using for a particular scan.
One thing you're not going to like is that some of the tools (the Digital ICE/ROC/GEM/DEE and Scan Image Enhancer) aren't real time. If you make a change with one of these items, you'll have to click the Redraw button to see what the change looks like. While this isn't a big deal once you know how everything works and how much adjustment you're likely to want to make, it is a big issue to newcomers to the product. You'll be changing a tool and clicking Redraw a lot until you figure out what each one does and how much adjustment results in how much effect. Just be sure that you're only changing one thing at a time, or else you'll be doing a bit more clicking down the line... Another annoying thing is that many of the tools have a Help button (rather than there being a centralized way of pulling up help on the tool where the cursor is, such as Command-? or F1 or right-click and select help). This makes the tool areas larger than they should be, and illustrates a pretty naive approach to software coding.
Fortunately, most of the controls are decipherable after a few pokes.
So what can you change? Let's look at the list of tools:
- Information. Simply a tool that tells you about the current selection in the image.
- Crop. The way you change output size and resolution. Actually cropping is handled by the usual rectangular marquee tool, which isn't found here.
- Curves. The traditional Nikon Levels+Curves+Histogram control.
- Color Balance. The crude Brightness, Contrast, Red, Green, and Blue adjustments.
- Unsharp Mask. The traditional sharpening tool.
- LCH Editor. Allows you to edit Lightness (luminosity), Chroma (saturation), and Hue (color) in a very unique and useful manner.
- Digital ICE4 Advanced. Where ICE, ROC, GEM, and DEE live.
- Analog Gain. While similar to Color Balance in that we have Master, Red, Green, and Blue adjustments, this is where you get direct access to the analog amplifiers in the scanner hardware, should you need it.
- Scan Image Enhancer. An automatic brightness and contrast adjustment tool (kind of like Auto Levels and Auto Contrast in Photoshop, only these work during the scan process itself).
- Scanner Extras. Apparently a catch-all category. This is where you can perform manual focus adjustments for warped slides, multiple sample scanning to remove digitizing noise, and, curiously, the pixel bit depth (8 or 16 bits).
Nikon Scan has a tabbed interface that allows you to look between your original scan and a fully processed scan (with your tool settings), which is a nice touch.
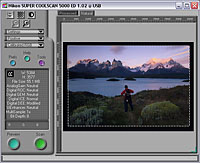
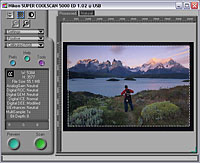
The unprocessed scan directly as it came from the scanner is on the top, the scan after processing through Digital ICE and Digital DEE is on the bottom. Even at these small sizes you should be able to see how the shadows at the bottom of the slide have opened up while the highlights are relatively unaffected.
The actual scanning is remarkably fast. At the full 4000 dpi, I'm through with a scan in about a minute with the options I usually pick (the actual scan can be as short as 20 seconds, but Digital ICE adds another 26 seconds, and DEE can add as much as 50 seconds, so my typical range is 0:46 to 1:36). Prescans take about 11 seconds. So, from starting Nikon Scan to looking at an image in Photoshop is usually less than a three minute process for me, though that's because I know the controls so well and don't spend much time tweaking settings trying to find the right combination. Expect it to take longer early on in your learning process. If you start Nikon Scan as a standalone application, there's no direct way to go to Photoshop from Nikon Scan as there is in Nikon Capture; you have to save in Scan and open in Photoshop. The workaround is to select Import->Nikon Scan from within Photoshop, which brings up the same Scan interface.
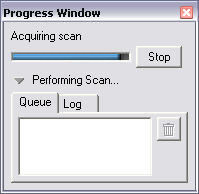
There's a nice progress indicator that tells you what's going on at any given time (and is really handy when you're using one of the multi-image loaders to batch a set of scans).
You can save settings for individual tools and reload them later, but there's no direct way to save a group of settings. Moreover, some things that I'd like to have saved settings for (e.g., pixel depth), don't have a save option.
ICE: Removes scratches and dust
ROC: Restores faded colors
GEM: Reduces film grain
DEE: Shadow/Highlight area enhancer
The Results, Please
I've been extremely pleased with the results from the Super Coolscan 5000 ED. Scans I've made using it have more shadow detail, more accurate color, and a surprising amount of detail. To achieve the best possible results takes some work, though. Specifically:
- Don't trust Digital ICE to do it all. Unlike Digital ICE on my old Coolscan LS-30, it works better on the Coolscan 5000. The slide we'll look at in a moment has a faint scratch on it that the latest iteration doesn't quite completely remove, but I also don't find any destruction of details as I found in previous iterations. Moreover, Digital ICE doesn't do anything about film grain (that's GEM, which I find to be too slow for what little effect it manages). I now run Neat Image noise reduction on every scanned image in addition to Digital ICE--the grainless, dustless, mostly scratchless results are impressive to say the least.
- Consider multiple scans and/or DEE. While the shadow detail produced by the Coolscan 5000 is decent, especially on slides that have an even, perfect lighting and exposure, most of my outdoor work has more range than the Coolscan 5000 handles without a bit of a nudge. With a single scan and the normal controls, I generally have to give up on highlight or shadow detail. Fortunately, the Nikon Coolscan 5000 produces remarkably repeatable results. Nikon Scan allows you to run up to 16 passes on a slide (though this obviously increases the scan time by 16x). It's a rare slide that needs this kind of treatment, but the ability is there if you need it. Better still, DEE (Digital Exposure Extender) allows you to manipulate either the shadow and/or highlight areas a little more directly; once you've learned the secret to the controls, you'll be able to pull out shadow detail you didn't know was there (especially in 16-bit acquire mode).
- Pay attention to details. The Coolscan 5000 has nice touches such as autofocus and Digital ICE, but I've found that you get slightly better scans if you pay attention to the emulsion side orientation and clean the slide prior to scan. Nikon's software gives you several ways to manipulate the linearization of the scan (ROC, GEM, DEE, LCH editor, Curves tool, and more), and it'll take you some time to figure out when you should be using one of the tools over the other. Short answer: DEE for shadow detail, LCH for color shifts, ROC+GEM for faded or older emulsions, Curves tool for simple adjustments; but be careful when using any of these together--generally only one-at-a-time is needed, and many of these tools interact.
I decided to try out the Coolscan 5000 on some images I had scanned with my older LS-30 (Coolscan III). I was expecting better results, but not this much better. Let's look at two images for a moment:


The top scan was done with the older Coolscan, the bottom with the newer one. While they were processed differently (I'll get to that in a minute), it should be obvious that the newer scanner obtained more detail and did a better job of holding highlight and shadow detail together. When I scanned the picture originally, the area below the lake (path, bushes, me) was deep in shadow and I had to use Photoshop controls to try to restore "brightness" in these areas. With the Coolscan 5000 I simply ran DEE on the original scan and made no other changes. This had a couple of impacts. First, colors shifted when I made the Photoshop changes on the original scan (and boy was it a pain to try to hold the detail of the bushes that extend up into the lake; I must have spent an hour refining my selection). But look at the area to the right and behind me. On the original scan, despite extensive manipulation in Photoshop, I never was able to restore detail in that area to the side of the path--it was simply not there. With the newer scanner, bingo, not only is the detail there, but it's good enough to see a broken twig on the ground (at full resolution).
The difference shows in my pants, as well (ahem...). On the Coolscan III version, my pants are black (simply because they rendered so dark that there weren't any color bits left). On the Coolscan 5000 I was initially surprised to see my pants pop up as dark blue, at least until I remembered that these were my rain over pants (I had shorts on underneath) and those are indeed dark blue. Even at this small size you ought to be able to tell that my pack is black and pants are a different color, something that doesn't come across in the original scan.
Overall, as I go back and scan slides I've scanned before, I keep discovering the same things: I'm getting more detail, fewer problems with scratches and dust, and (with DEE and the other software tools) pulling up more shadow detail and more accurate color. Not bad for a couple of generations of product.
Silverfast
Silverfast provided me with a review copy of their scanning software for the Coolscan 5000. My initial impressions are positive, though I think that the gap between the results I can generate from Silverfast versus Nikon Scan has dropped considerably. Moreover, one of the things I didn't like about early versions of Nikon Scan that I liked about Silverfast--the ability to tailor a process to a particular emulsion and get repeatable color--is no longer a big issue; Nikon Scan supports savable user settings and now has the ability to fine tune color in ways similar to Silverfast. More in a couple of months...
Coolscan 5000 Tips
- Set the Coolscan 5000 away from where light can hit the slide portal directly. Stray light that enters into the slide tray area can mess up your color, especially if it's fluorescent or incandescent. I've actually built a small flap that I lower over the entrance portal when I scan (there's a big window directly across from this area the way I have my scanner set up, and I think I've detected some slight edge effects [scans at night are a little different at the edge than scans during the day]).
- Even if you're using Digital ICE, it pays to make sure the slide is as clean as possible prior to scanning. I use a combination of compressed air (made especially for cleaning slides) and an anti-static brush before scanning.
- Don't be afraid to experiment with settings. Try each of the software tools Nikon provides. Just don't try them all at once. Use them one at a time and learn which ones interact with the others.
Which Coolscan?
The current Coolscan lineup is the US$599 V ED (LS-50), the US$1099 5000 ED (LS-5000), and the US$1999 9000 ED (LS-9000). There's not as much difference between the models as there used to be. Personally, as a 35mm-only shooter, I felt the 5000 ED was the best bet. Here's why:
- The 5000 and 9000 are 16-bit per color channel, the V is 14-bit. While not overly significant, it does show up a bit (pardon the pun) in the very extremes of exposure when using some of the software tools.
- The 5000 scans (best case) in 20 seconds, the V in 38 seconds (the 5000/9000 use multi-line CCDs, the V a single line). For most amateurs who scan a slide every now and then, this isn't a big deal, for someone like me who sometimes needs to quickly scan a bunch of slides, it makes a difference.
- The 5000 accepts an optional 50-slide feeder, and an optional roll film adapter that the V doesn't. If you're going to scan mass volumes of slides, this is a big difference, as you can do it in unattended batches.
- The primary attribute of the 9000 over the 5000 is that it accepts and scans 120/220 film as well as 35mm. For 35mm only users, I don't see any image quality aspects that the 9000 produces over the 5000 that are worth the extra US$900.
For those that are paying attention, the older 4000 ED (LS-4000) seems to be specified almost exactly the same as the newer V ED (LS-50): 14 bits, 38 second scans, not a lot of options. Thus, a used 4000ED is a strong possibility if you're considering a new V ED.
I received the following comment from someone who has used the slide feeder attachment: "While there is no doubt that it is a time saver, it is, in my experience inaccurate to say that it provides unattended automation. I find that slides tend to jam fairly frequently. If I'm sitting there babysitting the stack, I can often catch it and prevent the jam. If I miss it or if it happens when I'm not sitting at the scanner, then recovery from this state usually requires power cycling the scanner and quitting and restarting the scanning software. A pain, to be sure.
The weakness, I suspect, is two fold: first, a poor and slightly unstable mechanism controlling a metal plate that is used to set a gap through which the next slide (and only the next slide) must be moved by the loading mechanism, and second, an overly tight spring holding a plastic plate against the stack of input slides to be fed through the gap. This gap is set by a thumb screw on the side of the adaptor and it is not a piece of precision machinery. Working with the 20+ year old slides I've been scanning, there is tendency for two slides to stick together every so often and when this happens the plate controlled by the gap slider often fails to retain the second slide. Part of the cause of sticking, I suspect, is the excess pressure from the spring-loaded plate on the input stack pushing the next two slides together too tightly.
Thus, I'd suggest two improvements: a more precise mechanism to control the gap spacing and a means to control the pressure on the input stack holder plate."
Here's another response I received recently:
"My jamming problems come from the pushing piece of plastic being too thick, so that it catches on the film window of the next waiting slide, which is up against the fence, thus stopping the pushing mechanism from moving. I am thinking the designers used much thicker slides than I use. They say the magazine holds 50, I get 65, and this is to the load line. I tricked the machine by building out the guide with several layers of tape about 1/4" wide, and it corrected the jamming problem, but surely shows poor engineering. But that is true of the software too. The program locks up whenever there is a scanning problem, not very error tolerant. I used a IV before, and think it does better...if you have the time to load slides manually."
Here's a solution to the jamming problem.
Summary
Nikon's mid-level desktop scanner with ICE, GEM, ROC, and DEE, the Coolscan 5000 is capable of even the most demanding scan work.
Pro: Still modest footprint, reasonably fast scans (though slowed with ICE and other options), superb results when set correctly, USB 2.0 universality.
Con: Supplied software is still a bit awkward, ICE doesn't work perfectly, takes some time to find optimal setup.
Product Specification
- Optical Resolution
- 4000 dpi
- A/D Conversion
- 16 bit converters (or 8 bit) with ~4.8D density rating)
- Scan Time
- 20 seconds without enhancement, up to 2:42 with everything active
- Price
- US$1099 street
- Supported formats 35mm slide, 35mm negative (in strips or individually), APS (requires optional adapter)
- Size 3.8 x 6.8 x 12.4 inches (96 x 172 x 315mm)
- Weight 6.6 pounds (3kg)
